Building the Software Stack
This is the continuation from Part 1 located here.
Hopefully if you’re reading up to this point, you’ve now followed the instructions in part 1, and have a newly installed image on your Pi, or you’re already familiar with the Raspberry Pi, and you want to add the software stack to an existing pi. – If the latter is the case, then be aware that by this point I assume you already have SPI enabled. If you don’t it’d be wise to enable it before continuing.
If all is good, follow me after the jump.
Developer or User?
The first think I’d like you to think about is do you want to contribute back to the project? – I don’t have a huge amount of time to dedicate to the software side, and everything we’re about to do is built on string and duct-tape. It works for me, and I find it really useful. It comes with no guarantees or warranties of any sort!
If you’ve an idea, an improvement then please, I’d urge you instead of just downloading the source, fork it on git hub, and when you’ve something that works better than my implementation, submit a pull request! – I’m a huge fan of open source software, and would love the support to make this tiny little project something really interesting!
However, I know that there’s going to be some people playing with this that either don’t want to, or can’t and that’s okay; I’ll provide instructions on how to get this up and running regardless!
Pi HAT Modules
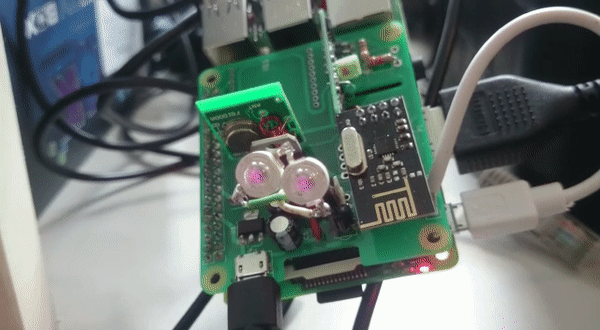
This tutorial assumes you’re working with the first production prototype.
There are 3 distinct modules on board and covered here, with an optional fourth, however I’ve left that there for future use only at this point.
- IR Receiver and Transistor switched breakout to drive 5v worth of IR LEDs
- 433MHz transmitter and receiver pair (either basic receiver or the more stable superhetrodyne receiver)
- Pin header for the nordic nRF24L01+ 2.4Ghz Radio.
- [Unused so far] pin header for a XBee® or XBee-PRO®
The easiest of these to get setup is the IR Receiver and Blaster, so lets start there:
Good old IR / LIRC on the Raspberry Pi
A lot of the devices around my home still use IR for remote interfaces, and it’s a good cheap option for everything from LED light strips to the TV / Projector / Theatre Amp etc. So for me, any home automation system had to be able to at least turn on and turn off the TV!
LIRC & alexba.in
A huge amount of thanks, and all the credit here goes out to the Linux Infrared Remote Control project and to Alex Bain who’s Open Source Universal Remote Control project kinda started this whole thing off. If you’ve interest in the back story, I’d recommend reading through his site! – While for my purposes I didn’t end up using the node.js side of the project it might well prove useful to you!
A note on hardware
If you’re using one of my boards, or you’ve built your own to the schematics, then the output of the TSOP38238 IR Receiver is wired to GPIO pin 23, and the output going to the transistor is wired to GPIO pin 22.
As the HAT design I’ve gone with intercepts power before delivering it to the Pi, and provides switched and smoothed 3.3V and ~5V rails separate to the Pi, I’m not worried about drawing too much current through the Pi’s GPIO bus. This means in my design I stepped up the transistor switching the LED’s from Alex’s P2N2222AG 600mA NPN to a 5A TIP 120 NPN. Functionally in this design they’re nearly identical, however the additional current switching capability lets me run 2x 940nm 3W 120 Degree LEDs (~1.4A @ 5v for two) instead of the more directional standard IR led’s that I found had to be pointed within 15 Degrees of the TV’s receiver.
All that said, let’s get LIRC setup.
First thing you’re going to want to do is update any outstanding packages on the Pi, to do this, from either the attached keyboard, or through your putty connection type:
|
1 |
sudo apt-get update |
Wait for that to finish and then run upgrade:
|
1 |
sudo apt-get upgrade -y |
The last command may take a little time depending on the speed of your internet connection, now is a really good time to go grab a coffee!
At the time of writing, the LIRC package is available via apt, so we can install it with the following:
|
1 |
sudo apt-get install lirc |
Once that’s in place and installed, we need to get LIRC configured with the correct GPIO pins for our board.
Again, all my work with LIRC comes from Alex Bain and I’d recommend checking it out if you’re interested. His writ-up is far more complete than mine, and I’m only mirroring his steps here for completeness.
As a quick reminder, the pin-out for the schematic I’m publishing and the board layout has:
GPIO for input is: 23
GPIO for output is: 22
Start an editor and modify /etc/modules by adding the three lines below to the end of the file.
|
1 |
sudo nano /etc/modules |
|
1 2 3 |
# Load and configure LIRC driver! lirc_dev lirc_rpi gpio_in_pin=23 gpio_out_pin=22 |
I’m using the exact same hardware conf as Alex – If it ain’t broken, don’t fix it!
So replace everything in /etc/lirc/hardware.conf with this:
|
1 2 3 4 5 6 7 8 9 10 11 12 13 14 15 16 17 18 19 20 21 22 23 24 25 |
######################################################## # /etc/lirc/hardware.conf # # Arguments which will be used when launching lircd LIRCD_ARGS="--uinput" # Don't start lircmd even if there seems to be a good config file # START_LIRCMD=false # Don't start irexec, even if a good config file seems to exist. # START_IREXEC=false # Try to load appropriate kernel modules LOAD_MODULES=true # Run "lircd --driver=help" for a list of supported drivers. DRIVER="default" # usually /dev/lirc0 is the correct setting for systems using udev DEVICE="/dev/lirc0" MODULES="lirc_rpi" # Default configuration files for your hardware if any LIRCD_CONF="" LIRCMD_CONF="" ######################################################## |
And finally edit /boot/config.txt and add the following to the end of the file:
|
1 2 |
# Enable LIRC! dtoverlay=lirc-rpi,gpio_in_pin=23,gpio_out_pin=22 |
Restart the pi, and you’re good to try it out:
Again, copying the the instructions from Alex for completeness:
|
1 2 |
sudo /etc/init.d/lirc stop mode2 -d /dev/lirc0 |
And if all has worked, pointing a IR Remote Control at the Pi and pressing buttons should yield output similar to this:
|
1 2 3 4 5 6 7 8 9 10 |
pi@OpenHab-Example:~ $ mode2 -d /dev/lirc0 space 1114225 pulse 2402 space 582 pulse 610 space 582 pulse 611 space 587 pulse 1203 space 581 |
To check it’s sending IR:
Alex suggests getting familiar with the irrecord application, and while I’ve no doubt this will be useful for those of you needing to copy existing remotes, it’s a little long winded here for a test and is something I’ll come back too.
For now, we can grab pre-built config files, and test either with a matching device, or a smartphone camera to ensure it’s sending.
Firstly I’d suggest looking here: http://lirc.sourceforge.net/remotes/
I Have a Sony TV and remote in front of me to test with, so I’m using the file here:
http://lirc.sourceforge.net/remotes/sony/RM-ED035
Backup the current lircmd.conf file (not technically necessary as right now it’s likely blank, but it’s a good habit)
sudo cp /etc/lirc/lircmd.conf /etc/lirc/lircmd.conf.orig
Open the config file to edit it
|
1 |
sudo nano /etc/lirc/lircmd.conf |
Then paste the content of the remote file into the end of /etc/lirc/lircmd.conf:
|
1 2 3 4 5 6 7 8 9 10 11 12 13 14 15 16 17 18 19 20 21 22 23 24 25 26 27 28 29 30 31 32 33 34 35 36 37 38 39 40 41 42 43 44 45 46 47 48 49 50 51 52 53 54 55 56 57 58 59 60 61 62 63 64 65 66 67 68 69 70 71 72 73 74 75 76 77 78 79 80 81 82 83 84 85 86 87 88 89 90 91 92 93 94 95 96 97 98 |
# # this config file was automatically generated # using lirc-0.8.6(default) on Sun Sep 19 10:37:21 2010 # # contributed by Angelo (Italy) # # brand: Sony # model no. of remote control: RM-ED035 # devices being controlled by this remote: Sony Bravias year 2010 (EX-50x for example, and many others) # begin remote name Sony_RM-ED035 bits 12 flags SPACE_ENC|CONST_LENGTH eps 30 aeps 100 header 2490 559 one 1252 539 zero 658 539 gap 44920 toggle_bit_mask 0x0 begin codes INPUT 0xA50 0xA90 # Was: STANDBY KEY_EXIT 0xC70 # Was: EXIT I+ 0x5D0 KEY_HOME 0x070 # Was: HOME KEY_OK 0xA70 # Was: OK KEY_UP 0x2F0 # Was: UP KEY_RIGHT 0xCD0 # Was: RIGHT KEY_DOWN 0xAF0 # Was: DOWN KEY_LEFT 0x2D0 # Was: LEFT KEY_1 0x010 # Was: 1 KEY_2 0x810 # Was: 2 KEY_3 0x410 # Was: 3 KEY_4 0xC10 # Was: 4 KEY_5 0x210 # Was: 5 KEY_6 0xA10 # Was: 6 KEY_7 0x610 # Was: 7 KEY_8 0xE10 # Was: 8 KEY_9 0x110 # Was: 9 KEY_TEXT 0xFD0 # Was: TELETEXT KEY_0 0x910 # Was: 0 KEY_MUTE 0x290 # Was: MUTE KEY_VOLUMEUP 0x490 # Was: VOLUMEUP KEY_VOLUMEDOWN 0xC90 # Was: VOLUMEDOWN KEY_CHANNELUP 0x090 # Was: PROGUP KEY_CHANNELDOWN 0x890 # Was: PROGDOWN KEY_AUDIO 0xE90 # Was: AUDIO BACK_STANDBY 0xA90 end codes end remote begin remote name Sony_RM-ED035 bits 15 flags SPACE_ENC|CONST_LENGTH eps 30 aeps 100 header 2494 555 one 1257 539 zero 652 539 gap 44920 toggle_bit_mask 0x0 begin codes SYNC_MENU 0x0D58 KEY_PREVIOUS 0x1EE9 # Was: PREVIOUS KEY_STOP 0x0CE9 # Was: STOP KEY_NEXT 0x5EE9 # Was: NEXT I-MANUAL 0x6F58 SCENE 0x0F58 ASPECT_RATIO 0x5E25 DIGITAL_ANALOG 0x58EE THEATRE 0x03EE FBACKWARD 0x6CE9 KEY_PLAY 0x2CE9 # Was: PLAY KEY_FASTFORWARD 0x1CE9 # Was: FFORWARD INTERNET_VIDEO 0x4F58 KEY_INFO 0x6D25 # Was: GUIDE KEY_FAVORITES 0x37EE # Was: FAVORITES KEY_OPTION 0x36E9 # Was: OPTIONS KEY_ENTER 0x62E9 # Was: RETURN KEY_RED 0x52E9 # Was: RED KEY_GREEN 0x32E9 # Was: GREEN KEY_YELLOW 0x72E9 # Was: YELLOW KEY_BLUE 0x12E9 # Was: BLUE KEY_SUBTITLE 0x0AE9 # Was: SUBTITLES end codes end remote |
Then restart lirc and check that the remote is setup:
|
1 2 3 |
sudo /etc/init.d/lirc restart sudo /etc/init.d/lirc status irsend LIST "" "" |
If everything’s working you should see irsend reply with
|
1 2 3 |
pi@OpenHab-Example:~ $ irsend LIST "" "" irsend: Sony_RM-ED035 irsend: Sony_RM-ED035 |
Finally, either try out the control, or check that the IR led’s are flashing with a mobile phone camera!
|
1 |
irsend SEND_ONCE Sony_RM-ED035 KEY_SLEEP |
Enjoy!