Send & Receive 443~Mhz Transmissions
Getting IR working is probably the most standard and well investigated side of this project. Now we’re starting to step off the beaten track, and while by no means a novel or undocumented step. Things are starting to get less straight forward.
Adding the ability for my Amazon Echo to control ‘dumb’ appliances was the main goal. I’d come across the Energenie products already, and the Pi-Mote shield looked good; but it seemed a waste of a board. If I’m using a Raspberry Pi – I don’t want it limited to one form of IO.
So while my own board is cheaper in cost, if you’re looking for a more ‘out of the box’ solution. I’d have a serious look at what’s out there already.
Anyway, if you’re intent on continuing, or are following this building off my schematics here we go:
The easiest way to do this is to clone the repo I’ve setup on git. But to do that we’ll need to install git.
|
1 |
sudo apt-get install git |
We’re going to setup in /usr/local/bin as we’re working on locally compiled software so:
|
1 |
cd /usr/local/bin |
The 433 Radio relies on WiringPi, so lets get that setup first:
Follow: https://projects.drogon.net/raspberry-pi/wiringpi/download-and-install/
|
1 |
sudo git clone git://git.drogon.net/wiringPi |
Have to use this behind proxy (not the official but should work for our needs)
|
1 |
sudo git clone https://github.com/WiringPi/WiringPi.git |
|
1 2 |
cd WiringPi ./build |
Hopefully you should then end up with the following output:
|
1 2 3 4 5 6 7 8 |
All Done. NOTE: To compile programs with wiringPi, you need to add: -lwiringPi to your compile line(s) To use the Gertboard, MaxDetect, etc. code (the devLib), you need to also add: -lwiringPiDev to your compile line(s). |
once that’s complete, change back to /usr/local/bin and check out the tailored versions of rf_pi and openmilight
|
1 2 |
cd /usr/local/bin sudo git clone --recursive https://github.com/NathanBarguss/automation_pi_hat.git |
To get the 433 transmitter / receiver pair running without root, there’s a few steps to follow. I’d suggest reading the full rf_pi README.md by n8henrie, however, for brevity and continuity’s sake I’ll post here too.
Make sure you have a gpio group, and whatever users will run the scripts (e.g. pi, n8henrie, gpio, www-data, etc.) are gpio members:
|
1 2 3 4 5 6 7 |
groupadd -f --system gpio grep gpio /etc/group sudo usermod -a -G gpio pi sudo usermod -a -G gpio gpio sudo usermod -a -G gpio www-data |
On the Pi 3 Raspbian Jessie image I’m using, scheduling priority is already enabled, however just to be on the safe side I’d recommend checking with:
|
1 |
sudo apt-get install libcap2-bin |
Configuring and Building
As of 2017-03-31 the pin numbering for the prototype board isn’t represented in the git repo yet!
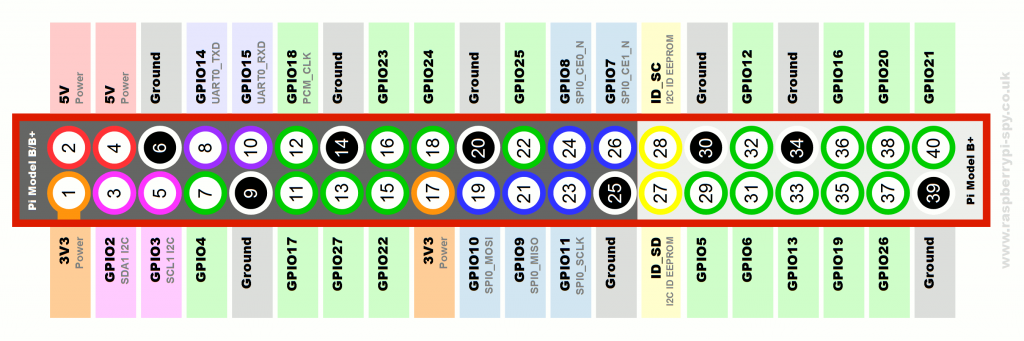
On my prototype the 433Mhz Transmitter is connected to Physical Pin 18 (BCM 24) and the Receiver to Physical Pin 12 (BCM 18)
Edit the /usr/local/bin/automation_pi_hat/rf_pi/send.cpp file and ensure that the pin is set to 24:
|
1 2 |
extern "C" int send(unsigned long long switches[], int num_switches, int iterations = 3, int pin = 24, int pulseLength = 190, int bitLength = 24){ |
Edit /usr/local/bin/automation_pi_hat/rf_pi/RFSniffer.cpp and ensure the pin is set to 18
|
1 2 |
// Use BCM number, see: https://wiringpi.com/pins int PIN = 18; |
Finally make with:
|
1 2 |
cd /usr/local/bin/automation_pi_hat/rf_pi make |
** That should be all up and running. ** Add more info on testing later