So, this is a little out of order, and I’ll add more to the build and design log soon. For now there’s a couple of people that wanted a quick start to get things going, they’re the ones I’m hoping will commit back to the repositories. So here goes, how to get from a basic pi, to an Alexa (Echo) enabled OpenHAB hub.
Getting Started:
Note: This draft is based on my ongoing build on a Raspberry Pi (original) Model B – Instructions should be portable between most iterations of the Pi, however some compile steps may need to be changed as far as I remember.
Note 2: This assumes you’re working from a PC running windows as your host.
Before you begin:
I’d recommend that you’re comfortable with Linux in some form, or at least happy to work with a command line. I’d also recommend downloading and having these tools to hand (they’re used in this walk-through):
- A 8GB or larger SD or MicroSD card – I’d strongly recommend a class 10 or better.
- A SD/MicroSD card reader – I’m using a laptop and the internal card reader works fine.
- Text Editor of Choice (I like Notepad++ and Visual Studio Code)
- Putty or an alternative SSH client
- WinSCP for easy file transfer (optional if you go the route of Samba shares)
- Win32 Disk Imager – ‘Burning’ the Raspien image to the Pi’s S D card.
- Ideally a 433Mhz Switchable device and remote control, these or similar.
- A Infrared remote controlled device such as a TV and it’s remote.
- A MiLight / LightEU Bulb to test with, and ideally a remote for it. (Note: they’re much cheaper from china, but I’m impatient)
- Raspbian image of choice (I use the ‘lite’ version personally, and this tutorial assumes the 2017-01-11 release; Kernel version:4.4)
Getting the image booting on the Pi:
Grab your (micro)SD card, and plug it into the computer’s SD card writer.
Once you’ve got the 2017-01-11-raspbian-jessie-lite.zip download, extract it to somewhere memorable might be good?) and then start Win32 Disk Imager
Once it’s open, browse or enter the path to the image on the left, select the physical device on the right (in my case the E:\ drive) and after double checking that you’ve the right device drive letter selected, press ‘Write’, read the warning, and if you’re sure, press ‘Yes.
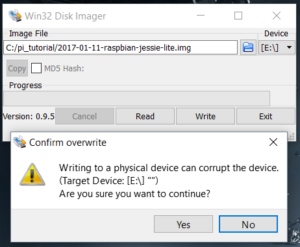
After a short while, depending on your choice of SD card, the speed of your PC and the will of whatever deity you care to name, you should be presented by the “Write Complete” box. Press ‘OK’ and it’s safe to remove the card from the PC and move on to the Pi!
Setup the Pi.
- To make things easier, I’m going to assume a couple of things:
- The Pi is currently physically connected by RJ45 – I’m not going to cover WiFi setup here.
- You’ve a display output connected, so you can see what’s happening on the Pi.
- You’ve a keyboard to enter commands to the Pi just for a little bit.
- You’ve a good power-supply available to power the Pi.
If all that sounds like your setup, then go ahead and continue reading. If not, I’m going to go grab a coffee while you get it done!
Back with me? Excellent! Insert the SD card into the Pi, connect the power, and lets begin.
Hello World.
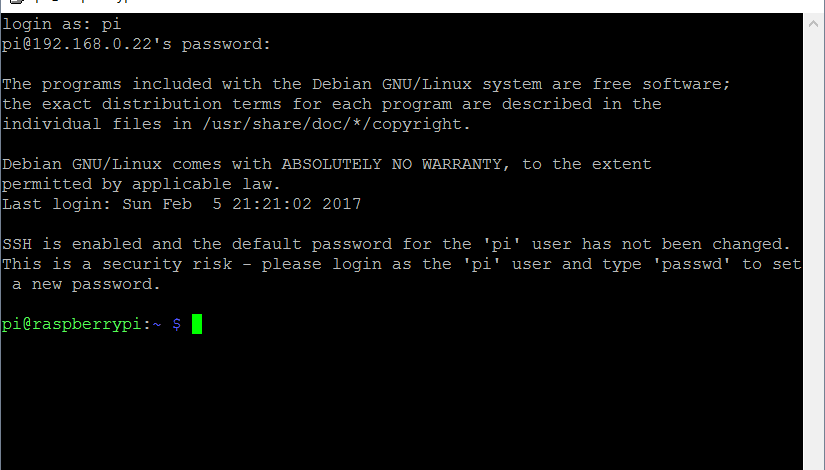
Everything is up and running, you’ve had the ‘resize boot file system’ splash and by now you should have the usual POST / Boot sequence of the Pi running up your display. If all is well, then after 30s or so everything should stop, and you’re left in the bottom left of the screen:
SSH Everywhere!
My next step is to get SSH up and running, it’s not enabled by default, but it’s not hard to get it running.
At the login prompt, enter the user name: pi and hit return, then when prompted for the password, enter raspberry and press return again. If all is well you’ll be treated to a command line:
Once that’s on screen, type sudo raspi-config then return.
This brings up the quick config options for the pi, navigate to 7. Advanced Options with the arrow keys, press enter, then down to A4 SSH and press enter. When you’re prompted “Would you like the SSH server to be enabled?” Answer Yes and wait for the “The SSH server is enabled” dialog, hit enter and you’ll be back at the main screen.
As of 30th March 2017, and moving to the Pi 3 as my development board the options seem to have moved: navigate to 5. Interfacing Options with the arrow keys, press enter, then down to P2 SSH and press enter. When you’re prompted “Would you like the SSH server to be enabled?” Answer Yes and wait for the “The SSH server is enabled” dialog, hit enter and you’ll be back at the main screen.
While we’re here it’s also a good time to enable SPI for the nRF24L01+.
Again, 7. Advanced Options this time A6 SPI and again Yes to the prompt.
Again, 5. Interfacing Options this time P4 SPI and again Yes to the prompt.
Once that’s done and you’re returned to the main menu, select Finish.
This should drop you back to the command line, so use sudo shutdown -r now to reboot the pi.
Back to the comfort of the PC
With Secure Shell enabled, we can use putty to do most of the rest of the work from a host PC elsewhere on the network. Again, this isn’t strictly necessary but it is my preferred way of working.
As long as you’ve got a correctly configured network running DHCP (that’s beyond the scope of this tutorial), and your Pi is connected to it by Ethernet cable, then 5 lines or so before your login prompt on the Pi’s physically connected display you should see this:
Where the IP address given is the address that the Pi has picked up from your network, in my case 192.168.0.22, this will be different for your Pi! Make note of the address, and then with the host PC, again connected to the same network as the Pi, lets fire up Putty.

In the host name (or IP address) box, type the IP address you made a note of on the Pi, leave the rest of the settings alone, and hit Open.
The next thing that should happen is that we receive a warning that the server’s fingerprint is not cached. Fingerprints and rsa key’s are important, but again out of scope for this tutorial.
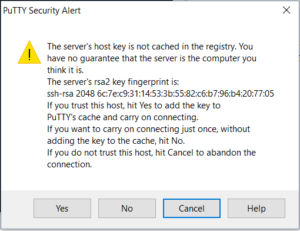
Accept the Pi’s key into your local registry by choosing Yes and you should now shown a terminal window prompting you to login,
Type pi and hit return and then the password as raspberry
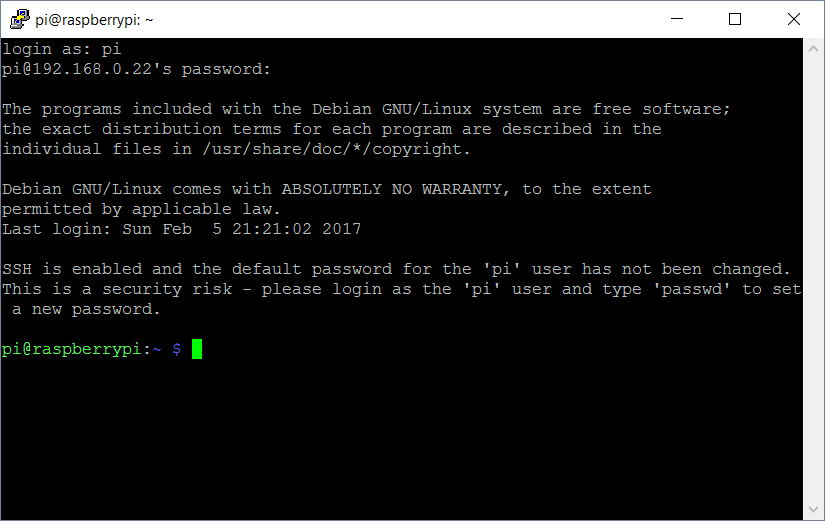
Take head of the warning that SSH is enabled, and the password for the default user hasn’t been changed. Now would be a really good time to change it, type passwd and follow the instructions.
Once that’s done, congratulations, you’ve a ‘blank’ pi, now ready to start building our software stack on!
(Continued in Part 2)